
Principal Architect
With over 30 years of industry experience, Neil has designed, developed, debugged, and supported software systems for numerous customers large and small. Initially, a C and assembler programmer, most of the last 20 years have been Java-based, with a focus on distributed systems, data grids, and stream processing. Neil is an occasional committer to the Hazelcast code base, with special interest on GoLang.
View all blogs by the authorDec 13, 2016
Step Away From The Database
A step-by-step example of how to introduce Hazelcast into an existing database backed application.
The example here takes a Spring JPA example and augments this with Spring Data Hazelcast for added speed and resilience, without discarding what is already there.
For a developer these are baby steps, but for an architect it’s giant leaps.
Hola A El Mundo (Hello World)
The application is language translation, English to Spanish.
If you put in “hello world” you should get back “hola al mundo“.
Code is available here.
Project Structure
The code is structured as a multi-module Maven project. We’ll take a very brief look at this now before going into the architecture, then return to it after.
├── after/

│   ├── after-domain/

│   ├── after-hz-main/

│   ├── after-jpa-repository/

│   ├── after-jpa-service/

│   ├── after-kv-repository/

│   ├── after-kv-service/

│   └── after-main/

├── before/

│   ├── before-domain/

│   ├── before-jpa-repository/

│   ├── before-jpa-service/

│   └── before-main/

└── database/

└── shared/

├── pom.xml

├── README.md
After
The modules in the after section hold the solution after Hazelcast is introduced. It is a re-working of the before section, with some sub-modules added and other changes. Each class has Javadoc explaining what has been changed.
Before
This is the original solution, without Hazelcast. It uses standard Spring to access a database and has a command-line processor for English input to Spanish output.
Database
This is the database, provided here as a standalone module so you don’t have to install anything.
Shared
Some shared objects for the before and after modules, for logging and debugging.
**Note**
You can build everything from the top level. As this uses Spring Boot, you need to run Maven as far as the package phase, so a command such as mvn install would be simplest.
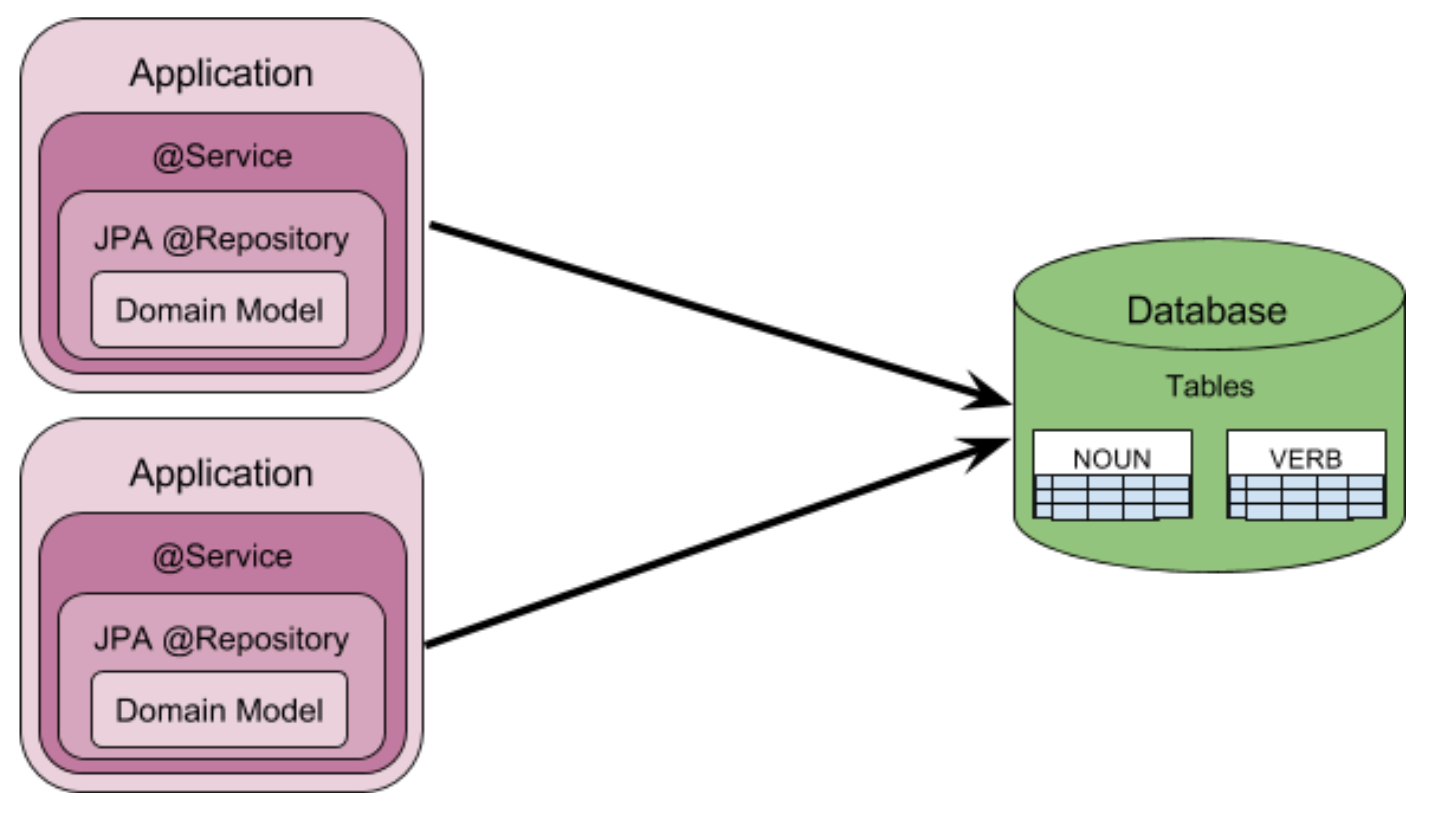
Before – Architecture
Refer to the following diagram:
This is a very simple architecture.
On the right is a database that contains some tables named “Noun” and “Verb“.
On the left are two instances of the application. As a typical Spring based module, this is composed in layers. The “Service” layer uses a JPA “Repository” to encapsulate access to the “Domain Model“.
Two instances of the application are shown, but it might be one or many. There is only one database here.
The application uses JDBC to connect to the database.
Step 1 – The Database
The first step is to have some sort of RDBMS or SQL database running.
The project provides one, using HSQLDB in server mode.
You can use this or you can use your own, so long as the same tables and data are present.
Using HSqlDB
The database module builds an executable Jar that runs an instance of the HSqlDB as a server process.
The tables
Two tables are created by src/main/resources/schema.sql for nouns and verbs.
The table “Noun” is defined as
CREATE TABLE IF NOT EXISTS noun (
        id                     INTEGER PRIMARY KEY,
        english                VARCHAR(20),
        french                 VARCHAR(20),
        spanish                VARCHAR(20)
    );
An id column for the primary key, and a String column for each of the English, French and Spanish versions of the noun.
Similarly, the table “Verb” is
CREATE TABLE IF NOT EXISTS verb (
        id                     INTEGER PRIMARY KEY,
        english                VARCHAR(20),
        french                 VARCHAR(20),
        spanish                VARCHAR(20),
        tense                  INTEGER
    );
“Verb” has mostly the same columns as “Noun“, plus a simplistic numeric way to indicate the tense, where 0 is past tense, 1 is present tense and 2 is future tense. There are clearly better ways to handle tense, but this is just an example.
The data
The “Noun” and “Verb” tables are populated by src/main/resources/data.sql, which adds 4 nouns and 1 verb as content in a fairly obvious way.
Try It
Start this with java -jar database/target/database-0.1-SNAPSHOT.jar.
This uses Spring Boot to bundle everything into an executable Jar, and Spring Shell for command line processing. When you start it up you should get something like this:

If you are unfamiliar with Spring Shell, the main thing to remember are the commands “help” and “quit” which will do what you expect. For now though, don’t shut the database down, we need it there for the later steps.
One command that has been added is “debugDB” to dump the table contents to screen. Try it and you should get something like this showing the nouns and verbs loaded.

Finally, note also that HSqlDB creates some files in the current directory, mydatabasedb.* for persisting database content. We can delete them all when the database isn’t running, or leave them.
Using your database
If you’d prefer, you can use an equivalent database to HSqlDB.
To do this you’ll need to do the following:
- Create the tables with the same names, structure and content
- Amend
pom.xmlto load the correct drivers and dependencies - Update all
application.propertieswith the new JDBC connection String. - Update
BeforeTranslatorConfiguration.javaandHazelcastServerConfiguration.javato set the driver class.
Not a difficult undertaking, but certainly error prone. Best to try with the provided database first.
Step 2 – Before migration
The application exists as a standalone Jar file, built from Maven modules.
before-domain
This module defines the data model.
There are three classes:
Nounholding the English, French and Spanish representation of a noun.Tensean enumeration for whether a verb is past, present or future.Verbholding the English, French, and Spanish representation of a verb, and it’s tense.
Noun and Verb both use standard annotations @Entity and @Id to allow Spring Data JPA to associate them with database tables.
Verb looks like
@Entity public class Verb implements Serializable {

    @javax.persistence.Id
    @org.springframework.data.annotation.Id
    private int     id;

    private String  english;
    private String  french;
    private String  spanish;
    private Tense   tense;
and Noun is the same except it has no tense field.
before-jpa-repository
This module defines Spring repositories to access the data model, using JPA for data access.
For both NounJPARepository and VerbJPARepository a method findByEngish(String s) is defined.
Eg.
public interface VerbJPARepository extends CrudRepository<Verb, Integer> {
    public Verb findByEnglish(String s);
}
This method instructs String to build a query method to search the database table for a match in the English column.
Other more basic methods for reading and writing are inherited from CrudRepository.
before-jpa-service
The next module is named before-jpa-service. However this naming is just for clarity, you would not normally need to expose that the service is using JPA as that is against the principles of encapsulation.
This service provides the business logic for translation.
For simplicity, this is just string replacement. Each word in the input is tested to see if is an English noun and if so the Spanish equivalent is replaced. If it not an English noun the same is tried for verbs. If no match is found then “?” is used.
The coding isn’t that relevant, all this is demonstrating is how the repositories are used to search.
before-jpa-main
The last module here is the main module, which embeds the service and provides command line interaction.
An application.properties file specifies the connection to the database — the database created in Step 1
Try It
Assuming the database from Step 1 is running, start an instance of the application using java -jar before/before-main/target/before-main-0.1-SNAPSHOT.jar.
You should get something like this: 
Start a second instance of the application if you like, in another window.
Now try entering a command into either or both to translate some text. Try translate --text "hello world"
You should get something like this: 
“Hello” isn’t a noun or a verb so doesn’t get translated. “World” becomes “Mundo“.
Finally, stop the database and try the translation again.
You should get something like this: 
The database is unavailable, so access to it fails and an error is logged (a JDBCConnectionException).
Before – Recap
This is a very simple application, but still demonstrates the typical Spring development approach.
Data is held in an SQL database.
The data model has a mapping defined by annotations to data tables, is accessed by JPA via a Spring @Repository, and this access is hidden in a Spring @Service
You can run multiple applications, but the database is the only place the data is stored, so if the database is unavailable the application is broken too.
After – Architecture
Refer to the following diagram:

This is still a simple architecture, though with a few more arrows than before.
On the right still is the database, with some tables named “Noun” and “Verb“.
On the left is the application, and again this still has two instances. What has changed from before is that JPA “Repository” has become a Key-Value “Repository“.
In the middle are shown three Hazelcast servers, holding a cached copy of the database content.
Each application on the left has a Hazelcast connection to all the Hazelcast servers.
Each Hazelcast server in the middle has a JDBC connection to the database.
After – End Goal
What we shall do here is introduce Hazelcast as a caching layer, between the application and the database.
There’s a few changes involved, but they’re all small and easy.
To make it simple for you to compare, this new version is separated from the old in the imaginatively named after sub-tree.
Step 3 – Data Model changes
after-domain in after is the amended version of before-domain in before.
after-domain
The data model doesn’t change.
What we do is introduce one annotation, @KeySpace to “Noun” and “Verb“.
So, “Noun” changes from
@Entity public class Noun implements Serializable {

    @javax.persistence.Id
    @org.springframework.data.annotation.Id
    private int     id;
    private String  english;
    private String  french;
    private String  spanish;
to
@Entity
@KeySpace
public class Noun implements Serializable {

    @javax.persistence.Id
    @org.springframework.data.annotation.Id
    private int     id;
    private String  english;
    private String  french;
    private String  spanish;
The @Entity annotation informs Spring that this object can be stored in a SQL table. Adding @KeySpace informs Spring that this object can also be stored in a Java map.
NOTE: Java maps are Key-Value stores, and the entire map content is a key-value space or keyspace.
Step 4 – Repository changes
We now have two repository modules.
after-jpa-repository is for JPA access to the domain model. after-kv-repository is for Key-Value access to the domain model.
after-jpa-repository
This repository will be used by Hazelcast to load the SQL data into memory.
The definition changes from
public interface VerbJPARepository extends CrudRepository<Verb, Integer> {

    public Verb findByEnglish(String s);
to
public interface VerbJPARepository extends CrudRepository<Verb, Integer> {

  @Query("SELECT v.id FROM Verb v")
  public Iterable<Integer> findAllId();
The original query findByEnglish() is removed. Hazelcast won’t search the database so it doesn’t need it.
Hazelcast will load everything in the database. So it needs the findAllId() query to find the identity column for all rows in the database. There isn’t an exact equivalent for this, so annotate this method with the SQL query to help Spring figure out what to do.
after-kv-repository
This is a new repository that the application will use to access the data from Hazelcast, instead of using the JPA repository.
However, it looks very much the same as the repository in Step 2. public interface VerbKVRepository extends HazelcastRepository<Verb, Integer> {
public Verb findByEnglish(String s);
All that’s really different is the repository extends HazelcastRepository instead of JPA’s CrudRepository. This is because the application will be connecting to Hazelcast and not directly to the database.
The findByEnglish() query is the one that was removed from the JPA repository in Step 4.
The application will still be searching for English words just it’ll be doing so against Hazelcast. So it needs that query method moved to here.
Step 5 – Service changes
We have two service modules each wrapping their respective repositories modules.
after-jpa-service
This service is used by Hazelcast servers for the initial loading of table content into database content.
Four methods are defined, all new for the Hazelcast server layer
public Noun findNoun(Integer id) public Iterable<Integer> findNounIds()

    public Verb findVerb(Integer id)
    public Iterable<Integer> findVerbIds()
These define ways to find the “id” column for all nouns and to load each one, and the same for verbs.
after-kv-service
This is the “TranslationService” again. This is identical from before, except it is now using Key-Value repositories instead of JPA repositories.
So it has changed from
public class TranslationService { @Autowired private NounJPARepository nounJPARepository;

@Autowired
    private VerbJPARepository verbJPARepository;
to
public class TranslationService {
    @Autowired

    private NounKVRepository nounKVRepository;


    @Autowired

    private VerbKVRepository verbKVRepository;
All other coding, the business logic, is unchanged.
Step 6 – Main program changes
In the after exammple there are now two types of main program. The application itself, after-main, and a new Hazelcast server after-hz-main.
after-hz-main
This process is entirely new.
It starts a Hazelcast server instance, which uses src/main/resources/hazelcast.xml as a configuration file.
This configuration has two parts
- A network section that specifies to look for other Hazelcast processes on 127.0.0.1 port 5701, and to join with any found there to form a cluster of Hazelcast servers.
- A map section that specifies Java maps to use to hold nouns and verbs, with a callback to Java classes that will populate these maps from the database.
after-main
This is the application, similar to before-main.
How it differs is it has a Hazelcast configuration file src/main/resources/hazelcast-client.xml that suggests some places where data can be found — the Hazelcast cluster after-hz-main.
Try It
Assuming you stopped the database in Step 2, start it again with java -jar database/target/database-0.1-SNAPSHOT.jar.
Now use java -jar after/after-hz-main/target/after-hz-main-0.1-SNAPSHOT.jar to start a Hazelcast server as a standalone Java application.
You should get something like this:

In the above, the line to look for is
Members [1] {
    Member [127.0.0.1]:5701 - 240652e9-b986-4e54-bf66-ff63650289fb this
}
As this shows a cluster of Hazelcast servers has been formed, and this process is a member of that cluster. At this time, the only member.
A cluster of one generally isn’t much use, so start another Hazelcast server using the same command in a different window, java -jar after/after-hz-main/target/after-hz-main-0.1-SNAPSHOT.jar.
You should get something like this:

Looking at the cluster members section towards the end of the start-up messages, you should see something like this
Members [2] {
    Member [127.0.0.1]:5701 - 240652e9-b986-4e54-bf66-ff63650289fb
    Member [127.0.0.1]:5702 - cd7ca2f0-181b-4e8d-8a6b-20fd9dc839dc this
}
Now there are two processes in the cluster, and this one is the second one (on port 5702).
From the command line, try the debugHZ command to see what content is in Hazelcast.

At the moment, there is no database content loaded, as we’ve selected lazy loading in the coding.
So, now there is a Hazelcast server layer to connect to, we can start the translation application with java -jar after/after-main/target/after-main-0.1-SNAPSHOT.jar and should see something like this:

The line here:
INFO: hz.client_0 [dev] [3.8-SNAPSHOT] HazelcastClient 3.8-SNAPSHOT (20161128 - 4a00c4f) is CLIENT_CONNECTED
confirms that the application process is acting as a Hazelcast client and has successfully connected to the servers.
Now, let’s try translating “hello world” again.

Because of the lazy loading, when we ask for work to be done the system kicks into life. Some log messages will appear at this point, but the result “? mundo” is there.
Let’s now take a look at the Hazelcast servers, here the first one:

What we see above is log messages of the style,
18:52:10.959 INFO  c.h.s.s.d.m.MyNounLoader - load(3)
18:52:10.962 INFO  c.h.s.s.d.m.MyNounLoader - load(4)
These are produced by the MyNounLoader as it loads noun 3 (“milk“) and noun 4 (“world“).
NOTE The loading workload is spread across the Hazelcast servers. Each will load some of the nouns and some of the verbs. Collectively each noun and each verb will be loaded once only. It is not easily predictable which Hazelcast server will do which, but if you run two you should find each does about half of the loading.
Given that loading has been run, we can try the debugHZ command again to list content.

Finally, stop the database again, and try the translation again.

Because the content is in Hazelcast, the translation service continues to work. No error need appear!
After – Recap
This is still a typical Spring application, with an independent caching layer introduced.
Data is still held in an SQL database.
Data access from the application is still done via Spring repositories, with a one-line change from JPA style to Key-Value style.
If the database goes offline, the application can now continue working without noticing.
Further work
The example demonstrates some key principles, but it could be extended in a number of ways.
- Interjections could be added as a table and domain object. Then we could have a translation for “hello” into “hola” and then finally translating “hello world” would do what was expected.
Realistically though, most value would come from boosting the database logic.
before-mainandafter-hz-mainthrow an exception if the database is unavailable. It would be valid for a Hazelcast server to join a cluster, then it could serve up what data it has toafter-main.- Reconnect logic could be added to the database connections, so if there is a temporarily blip on the database, nothing needs restarted.
Benefits
This example illustrates two very significant benefits to introducing Hazelcast.
Resilience
Resilience is very obvious if you’ve followed the example. The database can go offline and the application can keep working.
Even Hazelcast servers can go offline and the application can keep working. In this example one Hazelcast server is enough to cope.
Scaling
Less obvious here is the scaling, but look closely at how the nouns and verbs are loaded into the Hazelcast cluster.
If you run two Hazelcast servers you should find each loads about half of the data. There are four nouns, so that’s going to be two each.
If for some reason the load of two servers holding half the data each was too much, you could just run three servers and it’d be a third each, or four servers for a quarter each, and so on.
Drawbacks
Of course, it’s not all benefits, there are some downsides.
You need to run more JVMs than before, the build and deploy is a bit more complicated, and at least one developer needs to understand a bit about Hazelcast to configure the networking plumbing.
The other main downside is that JPA and KeyValue are not fully interchangeable, rather more that they overlap a great deal. If you’ve heavily optimised your build in a way that relies on specific JPA behaviour, then to some extent you’ve painted yourself into a corner.
Summary
An application using JPA to connect to a database is exposed to outages on the database.
If the application follows standard coding, then introducing Hazelcast as a distributed caching layer requires very little coding.
If Hazelcase is introduced there are immediate benefits of scaling and resilience.
Reducing the number and kind of queries hitting the database would enable the database to be replaced with a cheaper alternative or run on lower grade hardware.