
Hazelcast and OpenShift: Friends hand-in-hand
2015 was an amazing year for Hazelcast. Not only did the Hazelcast Enhancement Proposal process arrive but we also took the first community project through the HEP process – the cloud Discovery Service Provider Interface (SPI). The Hazelcast Discovery SPI is a huge step towards the transition from pure middleware to an enterprise platform.
In 2016 Hazelcast will continue to make great strides towards becoming a platform and the community is invited to be part of this journey. The Discovery SPI is the first part of a whole new SPI to support external extensions, plugins and services, integrated into the Hazelcast platform. Expect more to come 🙂
The Hazelcast Discovery SPI
The Discovery SPI is an extension point inside Hazelcast to integrate arbitrary plugins to discover IP addresses of other Hazelcast nodes running in the same cluster. Being fairly new and still marked as beta, the number of plugins is very nice and constantly growing. A few example integrations are ZooKeeper, Consul, Etcd and Kubernetes / OpenShift – the one we’re talking about today.
What is OpenShift?
OpenShift is a cloud deployment platform or what folks in the industry call a platform-as-a-service (PaaS) built on the foundation of standard and enterprise proven technologies like Docker and Kubernetes. Furthermore it provides an easy-to-use web-based administration GUI and CLI.
OpenShift describes itself on the openshift.org website: OpenShift 3 is built around a core of application containers powered by Docker, with orchestration and management provided by Kubernetes, on a foundation of Atomic and Enterprise Linux. OpenShift Origin is the upstream community project that brings it all together along with extensions, to accelerate application development and deployment.
What is Kubernetes?
Kubernetes itself is the cluster managing software running inside an OpenShift cluster. It provides fast, simple deployment and scalability of Docker containers and meets requirements of Hazelcast perfectly.
The tight integration into OpenShift makes it a perfect target to run Hazelcast clusters and applications using Hazelcast clients.
Integration? Why’s that?
We already talked about OpenShift and Kubernetes and how those integrate into the Hazelcast philosophy of simplicity and giving users a quick start.
However to support Kubernetes and OpenShift a small step had to be done. As already mentioned Kubernetes collects and manages the running Docker containers. Therefore the next logical step is to ask Kubernetes for all available Hazelcast members and retrieve their IP addresses. That is exactly what is achieved using the Hazelcast Discovery SPI and a Kubernetes plugin 6.
Putting the puzzle together and making a smooth transition between a local test setup and running inside a Kubernetes managed cloud, like OpenShift, is today’s task.
What’s needed?
To run Hazelcast (members or clients) inside OpenShift consists of 3 basic steps: * Configure Hazelcast to run with Discovery SPI and Kubernetes lookup * Deploy the Hazelcast Docker image inside OpenShift * Be happy 🙂 What sounds easy, is not as easy as you get started with OpenShift and Kubernetes, but in the end you’ll figured out all the little sidekicks those systems offer and you’ll start to love or hate them. It hopefully will be love!
Let’s Get it Rollin’
The easiest way to get started is using Vagrant and the OpenShift Docker images.
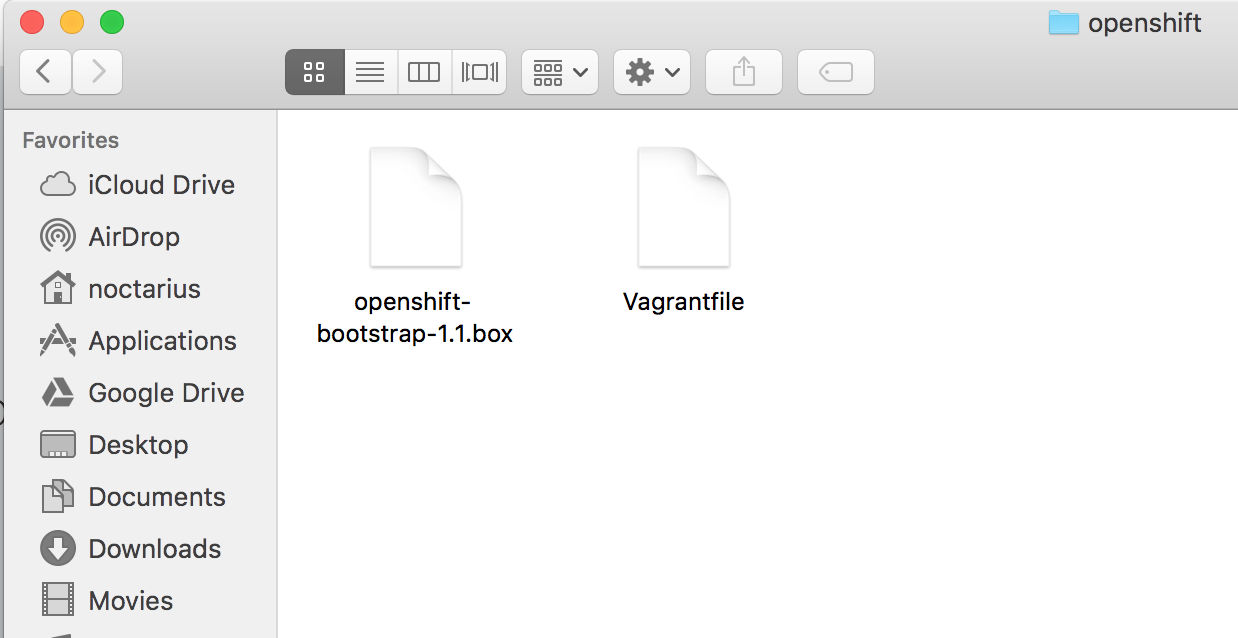
After installing VirtualBox (or VMware or any other supported HV technology – I recommend VirtualBox) and Vagrant, we’re heading to the OpenShift VM page to download their Vagrant files. We need the “Vagrant Box File x.x.x” and “Vagrantfile” and store both inside the same directory, best to use an empty one.
After successful downloading those files we need to import them to make Vagrant aware of the image and VirtualBox able to execute it. Please run the command from the directory where you downloaded the files, for me this was “Downloads/openshift”, if you used something else, please change the command accordingly:
cd ~/Downloads/openshift
   vagrant box add --name=openshift-vagrant openshift-bootstrap-1.1.box
Obviously you have to exchange the shown version with the real number given from your download. This process will take a moment while the virtual machine is created and imported into VirtualBox. When it is done, you should see something like the following output:
Mac:openshift noctarius$ vagrant box add --name=openshift3 openshift-bootstrap-1.1.box
    ==> box: Box file was not detected as metadata. Adding it directly... ==> box: Adding box 'openshift3' (v0) for provider: box: Unpacking necessary files from:
    file:///Users/noctarius/Downloads/openshift/openshift-bootstrap-1.1.box ==> box: Successfully added box 'openshift3' (v0) for 'virtualbox'!
If you see the word “Successfully” you know you did it, you finished the first step, if not – start over again. Otherwise we can go on and start up our new vagrant based VM running OpenShift with a simple command:
vagrant up`
Again this process takes some time for the first start of the virtual machine. For further starts using the same command it will be faster, I promise 🙂
After the final import into VirtualBox you’ll see something like the following output and that means you’re good to go:
Mac:openshift noctarius$ vagrant up


Bringing machine 'default' up with 'virtualbox' provider... ==> default: Importing base box 'openshift3'... ==> default: Matching MAC address for NAT networking... ==> default: Setting the name of the VM: openshift3 ==> default: Clearing any previously set network interfaces... ==> default: Preparing network interfaces based on configuration... default: Adapter 1: nat ==> default: Forwarding ports... ... ==> default: Machine booted and ready! ...
You might get some more information after the “booted and ready”, for example about guest additions not matching the version, however you can ignore them for now.
We successfully imported and started our OpenShift VM, so far so good. Now it’s time to connect to it and set up our “application”. An application in terms of OpenShift is a deployment unit consisting of one or more image streams (mostly Docker images), Replication Controllers (managing the scaling) and other components. For further information please see the OpenShift and Kubernetes documentation. However we’ll look into certain parts of the deployment descriptor. First of all let’s get this installed and running:
vagrant ssh
We’re now connected into our running OpenShift virtual machine. The following command will provide us with root rights, authenticate us against OpenShift (user: admin, password: admin), Kubernetes and Docker, create a new project and install our deployment descriptor into OpenShift.
sudo su
    oc login https://localhost:8443 oc new-project hazelcast-cluster oc project hazelcast-cluster curl -o hazelcast-template.js https://raw.githubusercontent.com/noctarius/hazelcast-
    openshift/master/hazelcast-template.js oc create -f hazelcast-template.js -n hazelcast-cluster
The last step should end with an output like:
template "hazelcast-openshift" created
Inside the Hazelcast-Template.js
After we finished our preparations let’s have a quick look at the hazelcast-template.js file we just downloaded and installed. It consists of a set of sections defining what to install for our application, meaning which components our applications consists of. Our application is fairly simple and defines a Hazelcast docker image and a Replication Controller to scale the image up and down. It also defines some parameters that have to be set when deploying the template. We’ll see those parameters in a bit moving forward to a deployment of the cluster and our application.
Ok let’s look at the image definition first. We use a Docker image from the Docker central repository, however at the moment it is not the official Hazelcast Docker image but it will be possible to be used shortly!
"spec": {
    "containers": [{
        "image": "noctarius/hazelcast-openshift:latest",
        "name": "hazelcast-openshift",
        "env": [{
            "name": "HAZELCAST_KUBERNETES_SERVICE_DNS",
            "value": "${SERVICE_NAME}.${NAMESPACE}.svc.${KUBERNETES_SERVICE_DOMAIN}"
         }, {
             "name": "HAZELCAST_KUBERNETES_SERVICE_NAME",
             "value": "${SERVICE_NAME}"
         }, {
             "name": "HAZELCAST_KUBERNETES_NAMESPACE",
             "value": "${NAMESPACE}"
         }, {
             "name": "HAZELCAST_KUBERNETES_SERVICE_DNS_IP_TYPE",
             "value": "IPV4"
         }, {
             "name": "HAZELCAST_TYPE",
             "value": "${HAZELCAST_TYPE}"
         }],
             "ports": [{
                 "containerPort": 5701,
                 "protocol": "TCP"
         }]
    }]
    }
We see the Docker image definition “noctarius/hazelcast-openshift:latest” and the internal name of that image “hazelcast-openshift”. In addition we see a few environment parameters to override the values inside the hazelcast.xml that is part of the Docker image and a port definition (tcp/5701) of the Hazelcast node listening on. That’s it, it really is that simple.
The second part describes the Replication Controller which is necessary to scale out our application. You won’t have to define it, it is created automatically, however we want some configuration like naming schema of instances and stuff.
{
    "apiVersion": "v1",
    "kind": "ReplicationController",
    "metadata": {
        "generateName": "hazelcast-cluster-rc-${DEPLOYMENT_NAME}-"
    },
    "spec": {
        "replicas": 3,
        "selector": {
            "name": "hazelcast-node-${DEPLOYMENT_NAME}"
    },
    "template": {
        "metadata": {
            "name": "hazelcast-node",
            "generateName": "hazelcast-node-${DEPLOYMENT_NAME}-",
            "labels": {
                "name": "hazelcast-node-${DEPLOYMENT_NAME}"
            }
    }, "spec": {
        ... Docker image configuration from before
    }

    }, "triggers": { "type": "ImageChange" } } }
We first define the name of the Replication Controller itself, afterwards we make some basic assumptions like we want 3 instances of our application (replicas=3) and how our instances should be named (generateName=hazelcast-node-${DEPLOYMENT_NAME}-). The rest is not that interesting and more a configuration on how Kubernetes and OpenShift are going to handle those created instances. You’ll find more information about the different configuration properties in their documentation and examples.
In the end, we also defined a service but just to instruct Kubernetes to keep track of the IP addresses of our nodes to make those available for discovery.
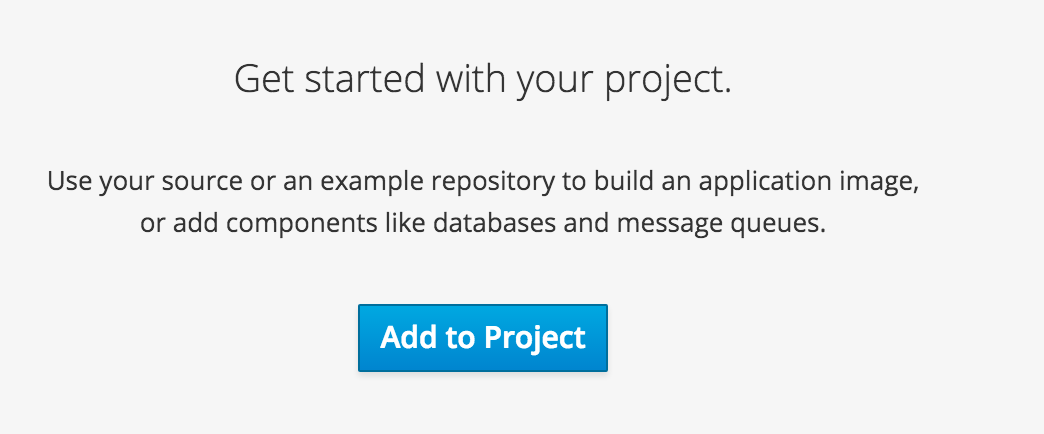
Deploying the (Hazel-)Nuts Now we’re going to get serious. Deploying a Hazelcast cluster just out of the web UI.
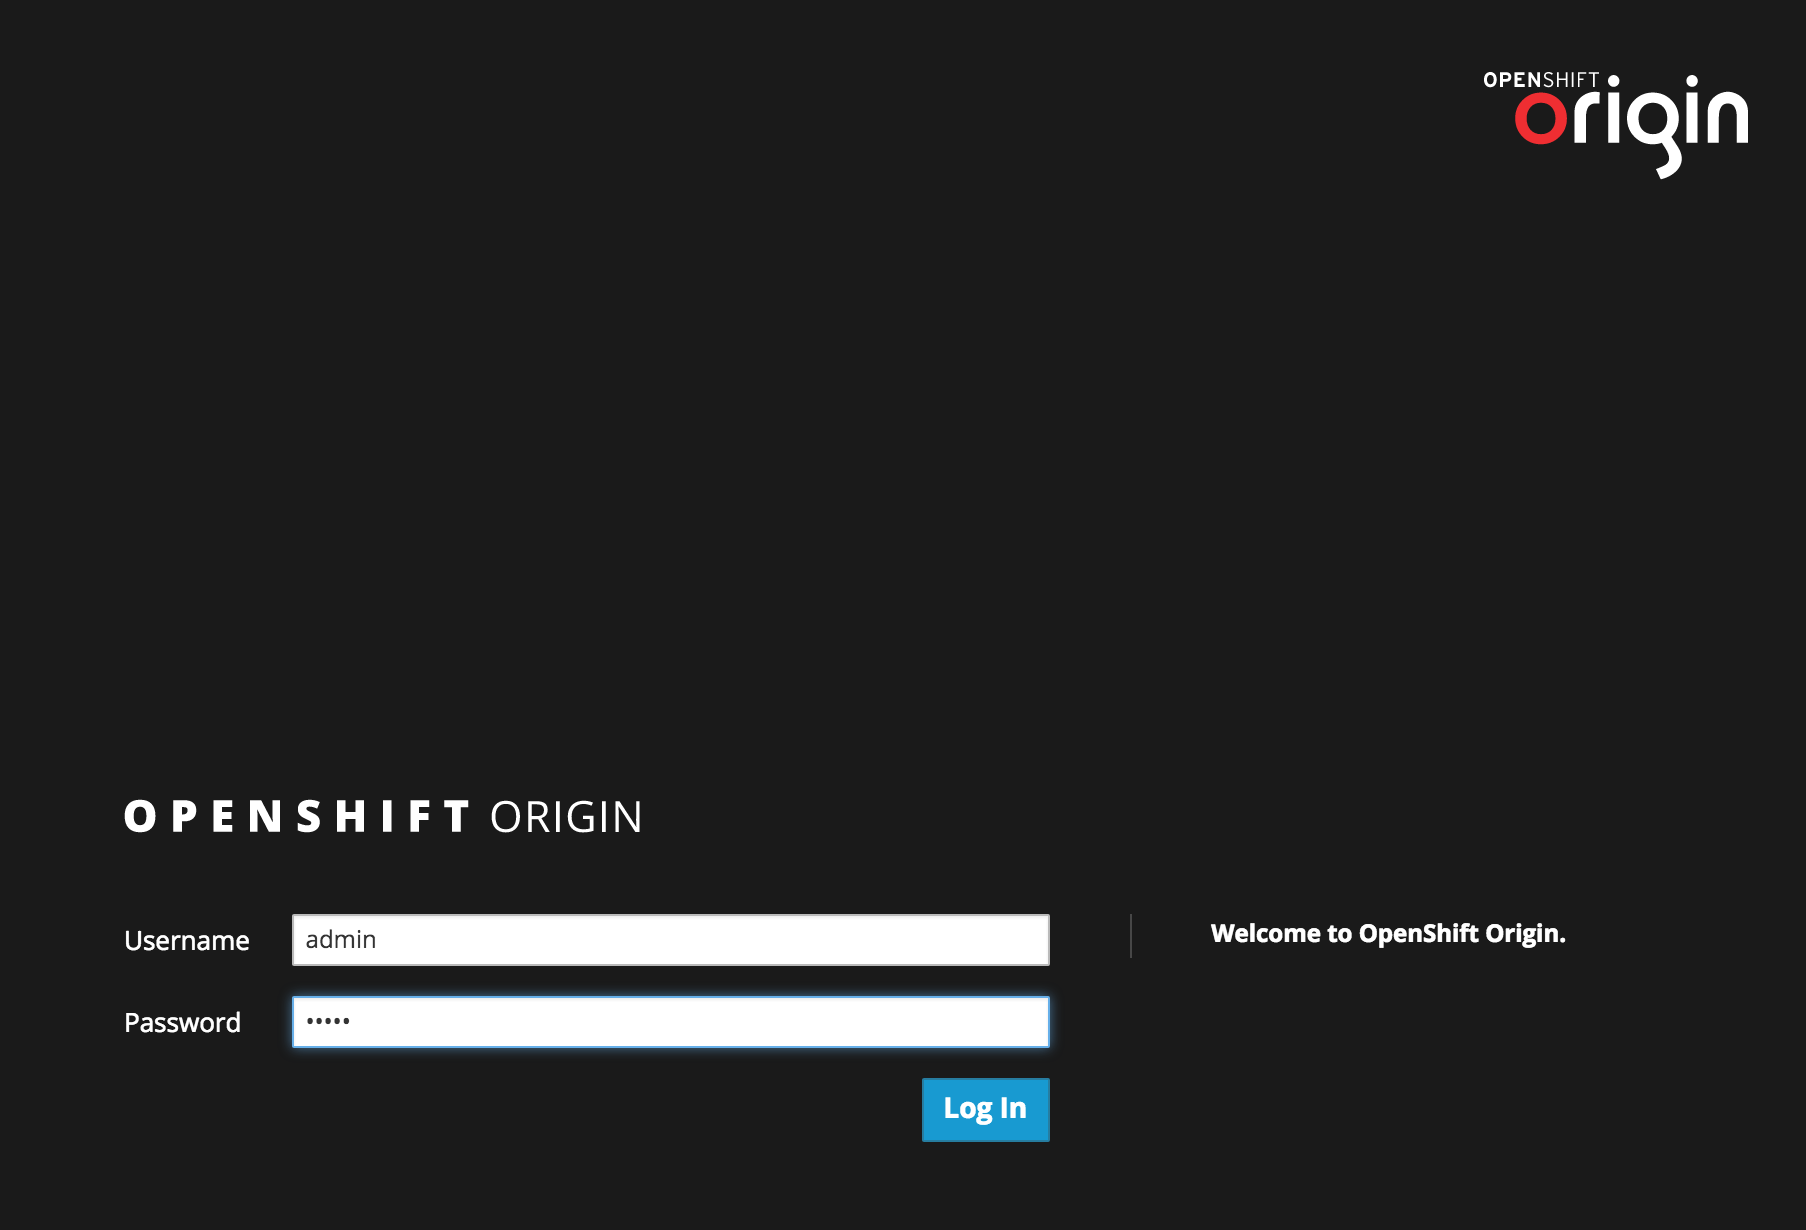
Log in to the Web-Administration using https://localhost:8443 and if you’ve got presented a security warning, just ignore it. Obviously the Vagrant based image of OpenShift doesn’t have a matching SSL certificate. You’ll see a login screen, and believe me, you can guess the credentials (if not: admin/admin ;-)).
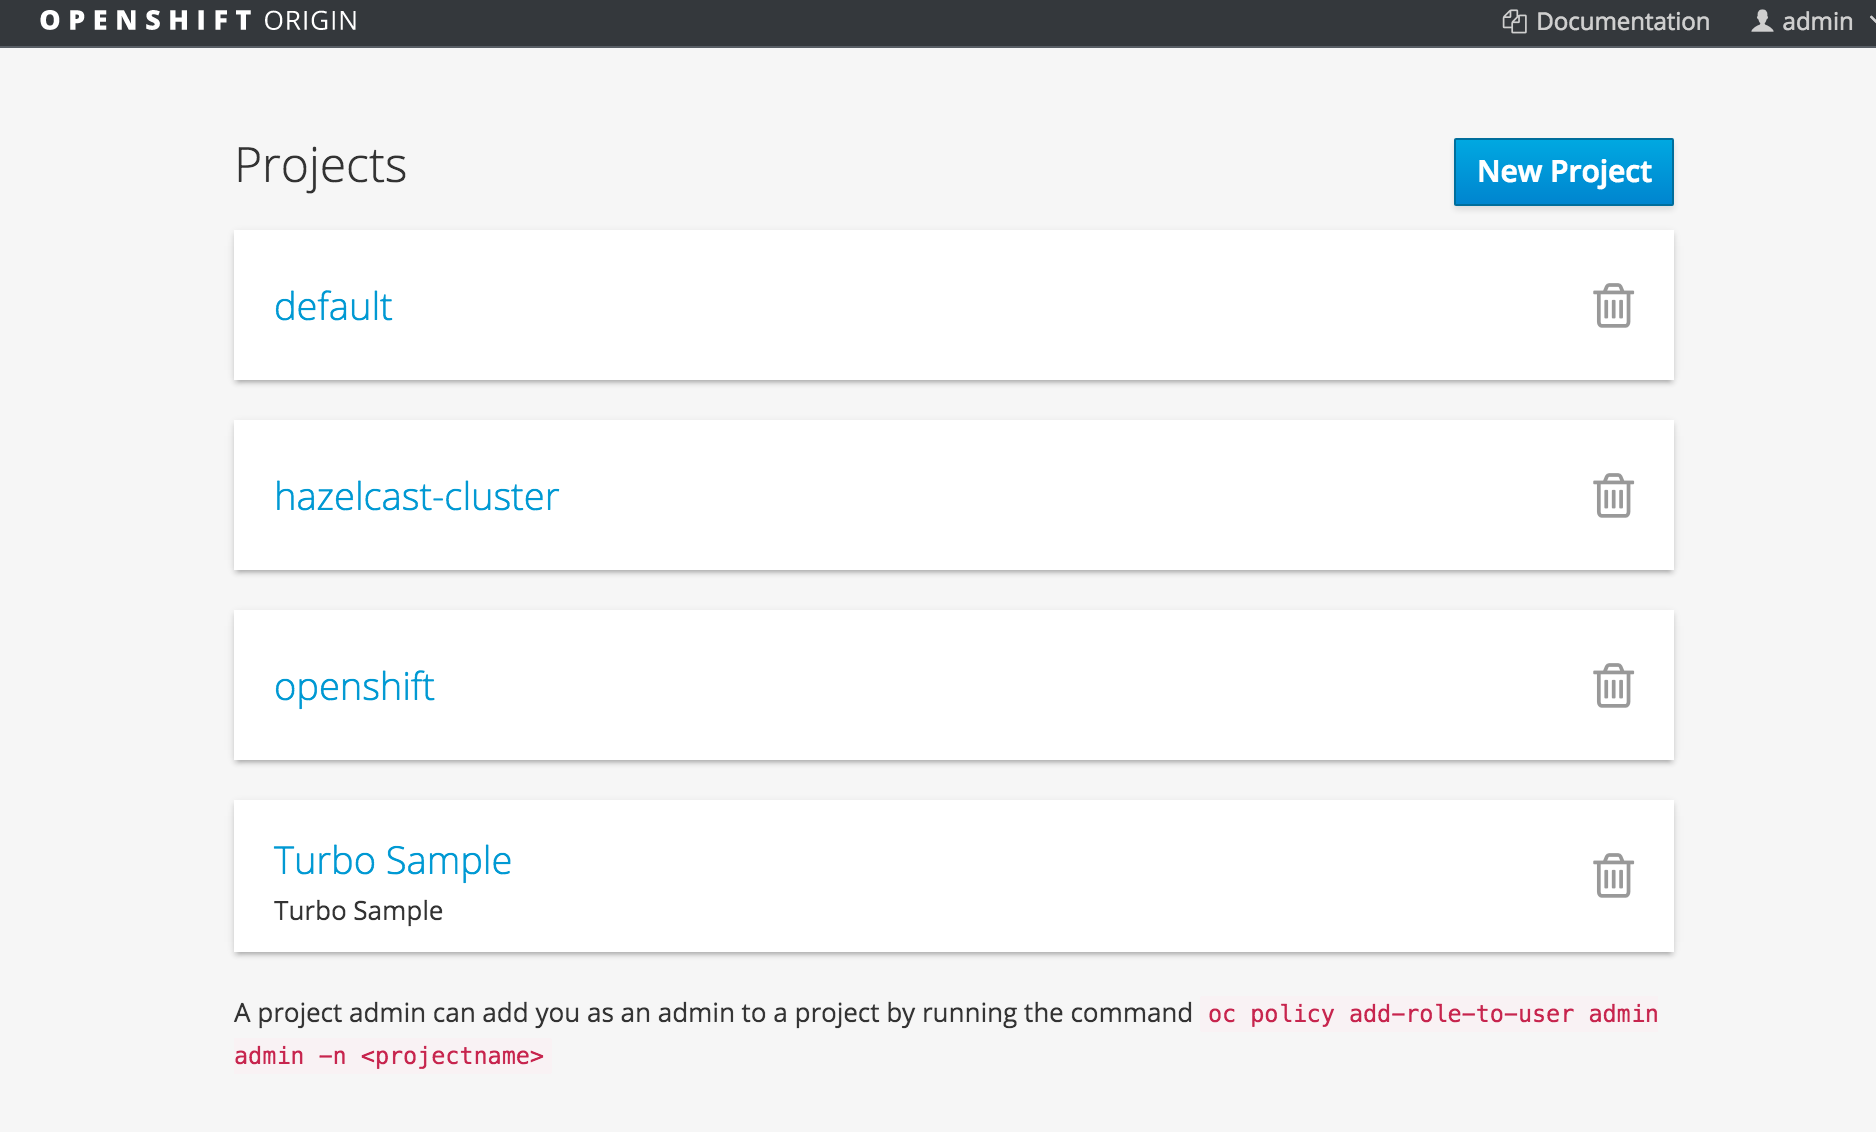
We’re given a project selection screen and select our previously created project called “hazelcast-cluster”
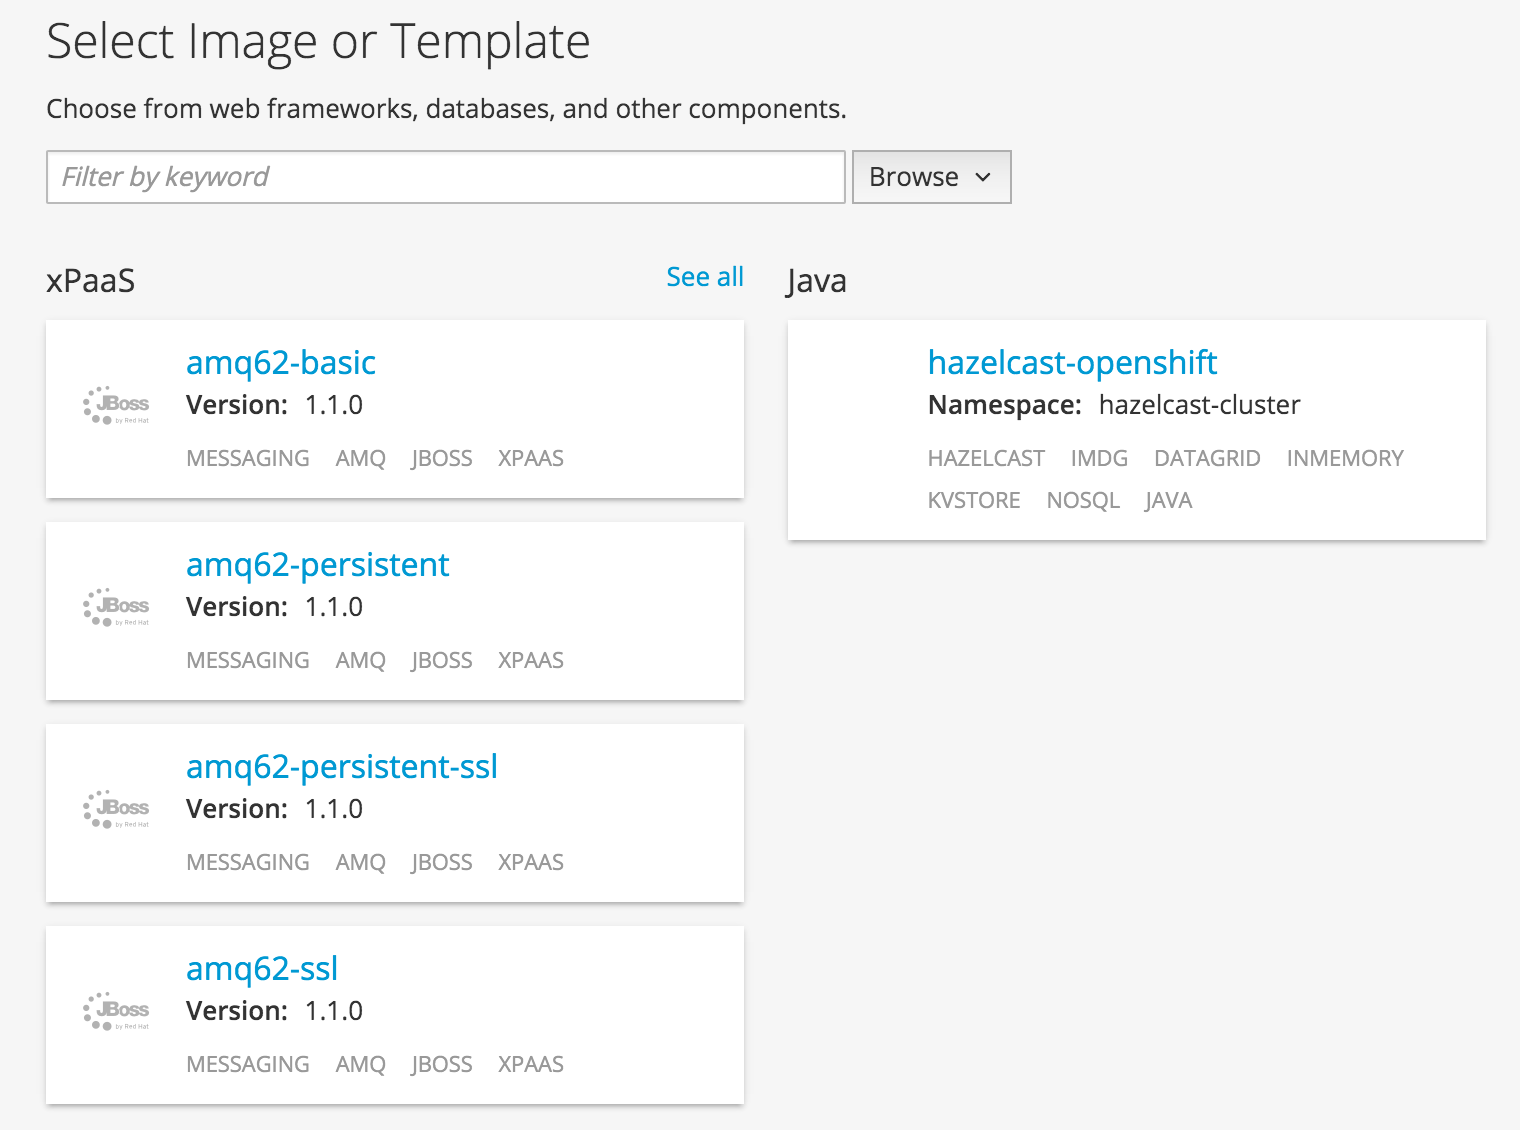
We select “Add to Project” and come to the template selection screen. It shows our imported Hazelcast template (named “hazelcast-openshift”) and we’ll select exactly that.
We now see the configuration parameters defined in the “hazelcast-template.js” to configure the discovery strategy and the way Hazelcast is supposed to be started. The given application and Docker image can be used as Hazelcast member or client and will change the internal behavior accordingly to the selection. We’ll use it as a Hazelcast cluster running members and make them connect together.
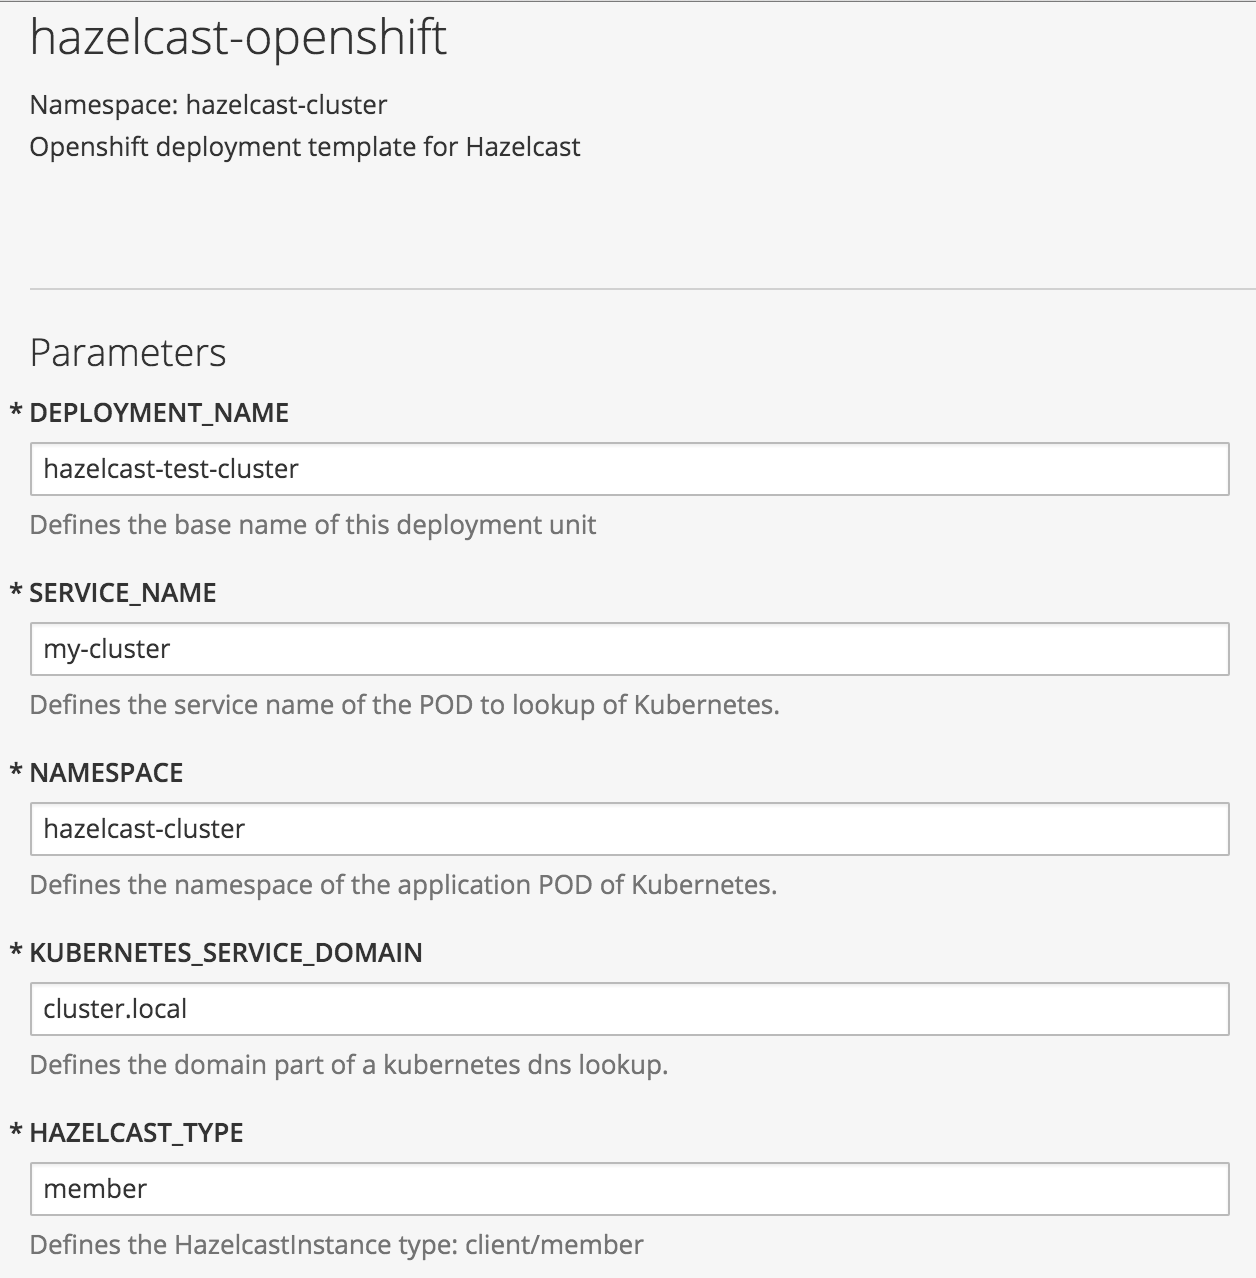
We set up a name for our deployment instances (DEPLOYMENT_NAME), for the service we want to use for the discovery lookup (SERVICE_NAME) and the namespace (NAMESPACE). The namespace is the only important thing, it needs to match your project name, however the other two values need to be unique inside the project too. As HAZELCAST_TYPE we set “member” since we want to have a cluster running.
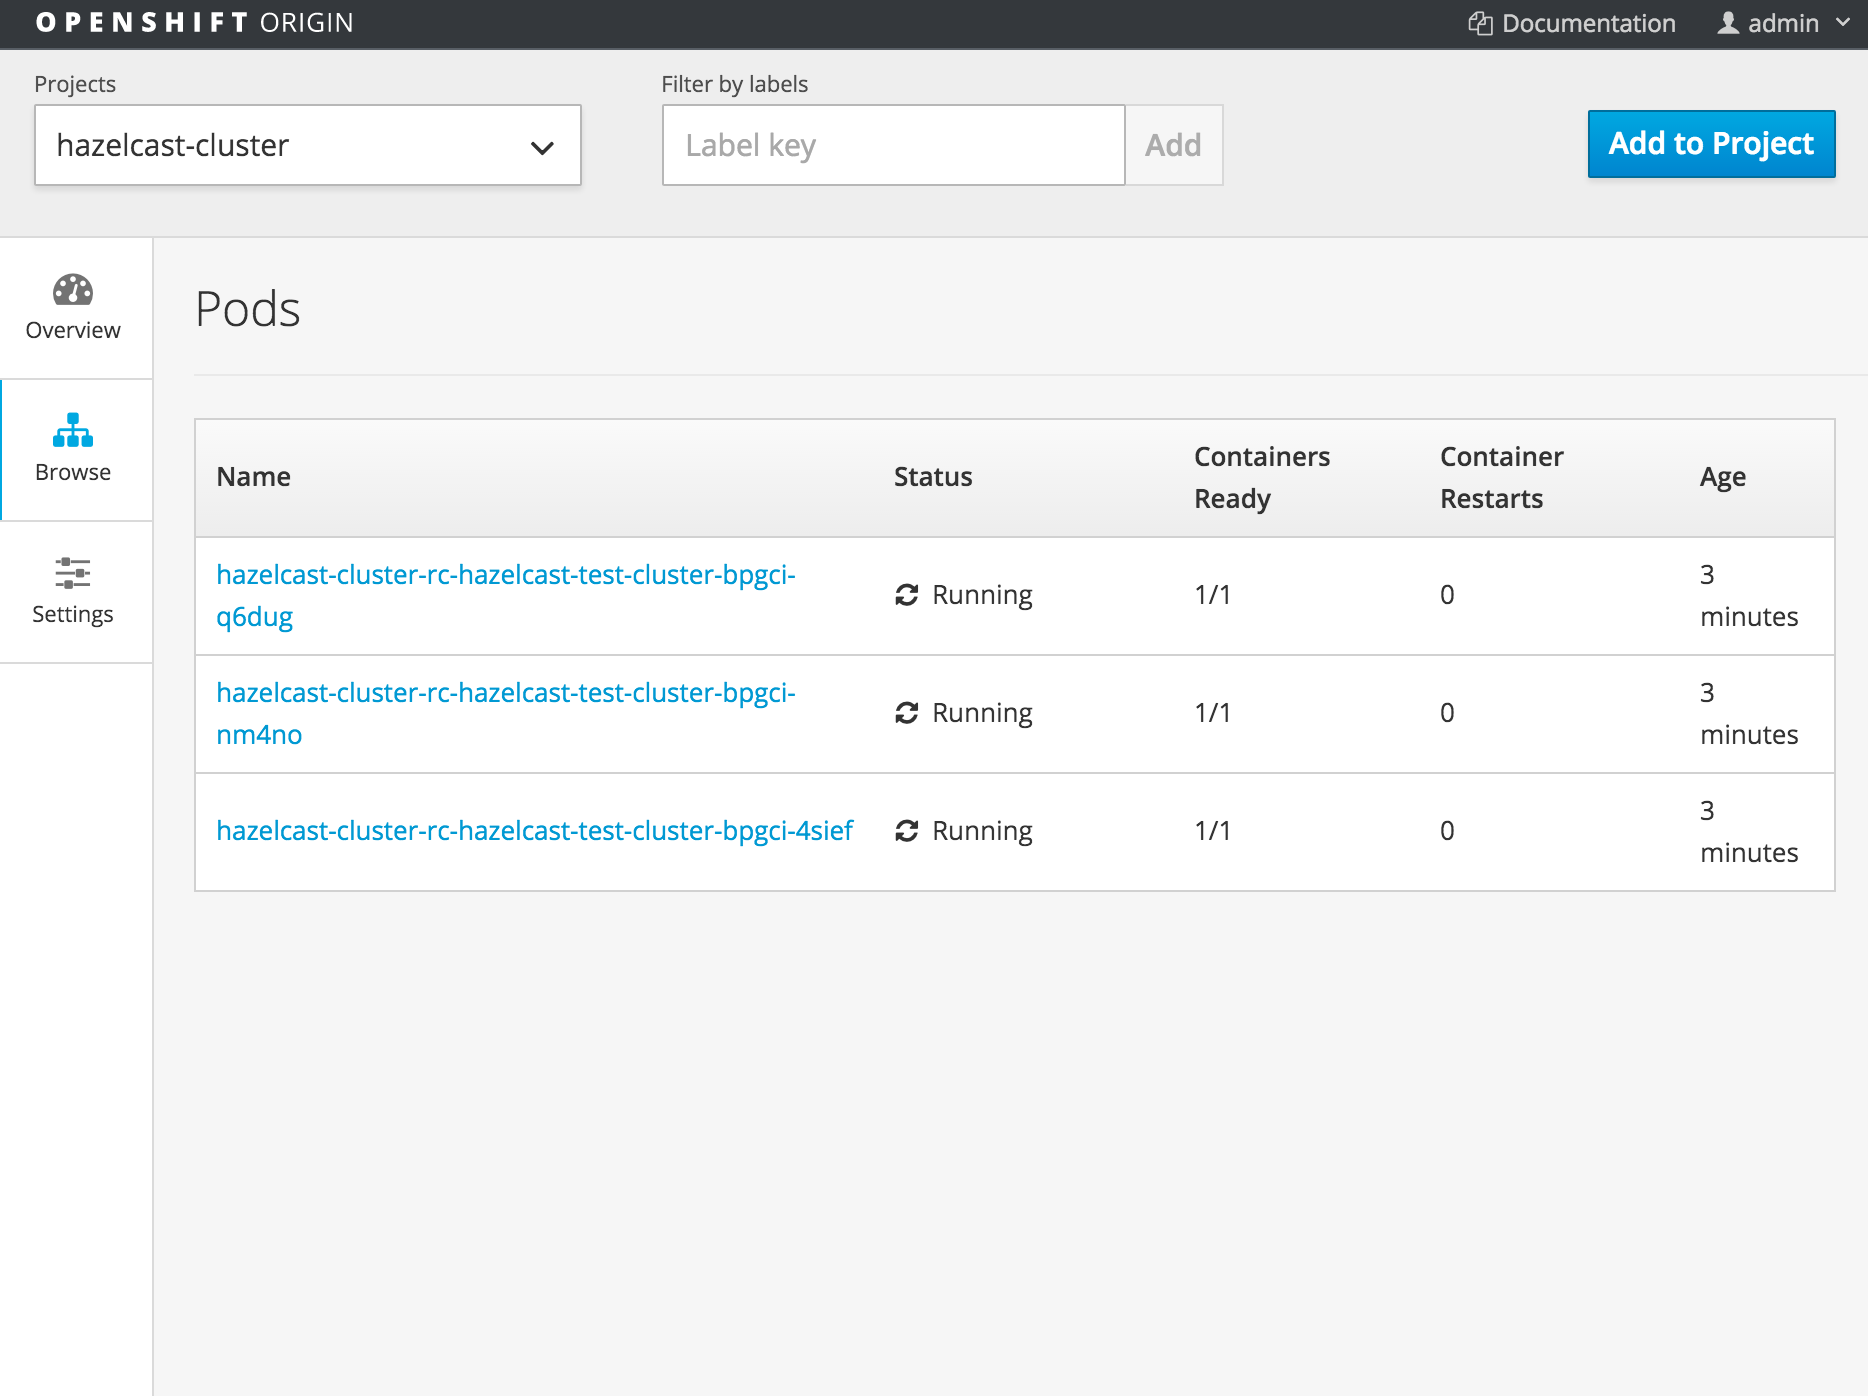
Eventually, after all values are set, we click on “Create” and see the nodes being deployed and started. This can take a while since the Docker image is downloaded, the file system layers are build and merged. Give it a few moments depending on your Internet connection speed. Eventually you should be able to see the running containers (PODs in terms of Kubernetes) under “Browse, Pods”, like in the following screenshot.
Looking at one of the containers log (click on one of the containers and on select the log tab) you’ll see the container’s log file output and that the Hazelcast members successfully found each other and that they connected together to build the cluster we all know and love.
35 Jan 01, 2016 7:06:24 PM com.hazelcast.nio.tcp.TcpIpConnectionManager
    34 INFO: [172.17.0.8]:5701 [dev] [3.6-EA2] Established socket connection between /172.17.0.8:35077 and /172.17.0.6:5701 35 Jan 01, 2016 7:06:31 PM com.hazelcast.cluster.ClusterService 36
    INFO: [172.17.0.8]:5701 [dev] [3.6-EA2] 37
    38 Members [3][2] { 39 Member [172.17.0.6]:5701 40 Member [172.17.0.7]:5701 41 Member [172.17.0.8]:5701 this 42 } 43
    44 Jan 01, 2016 7:06:32 PM com.hazelcast.core.LifecycleService 45 INFO: [172.17.0.8]:5701 [dev] [3.6-EA2] Address[172.17.0.8]:5701 is STARTED
And that’s it! Hazelcast being running inside OpenShift, deployment and discovery of nodes managed by Kubernetes. For full source of the Hazelcast Docker image I’ve used for this blogpost please see here.
For more information about the Hazelcast Discovery SPI, or if you want to build your own plugin, find more information inside the Hazelcast documentation.